
Tuesday 12 June 2012
Chalk Pastel Ombre Hair Tutorial
Since getting rid of my blonde and pink, I have been missing my crazy coloured hair like mad. Saw the tutorial for chalking your hair and thought I'd share - at least this is a quick fix if you have a hot iron/curler. Oh pink hair, how I miss you!
For more details you can visit Kandee's blog.
Tuesday 15 March 2011
DIY Knit: Helix Scarf

Gorgeous waves of yarn inspired by the sea. This project is one I have to try this winter. We're finally starting to see some cooler weather in Sydney, so this should be a fun one to do soon. I think this would look great in a green. You can get the Helix Scarf pattern from Knitting Daily - it's a 29 page ebook (approx 7mb).
Saturday 12 March 2011
Limited Edition Labyrinth Worm Plush
One of my favourite childhood movies is Labyrinth. I've actually lost count of the number of times I've seen it. Yes, I've owned it on VHS (remember them?) and just recently I got it on DVD. I'm a sucker for this film, and no, I didn't have a thing for David Bowie as the Goblin King.
I wanted to be Sarah and save the little baby half brother, Toby. I wante to wear the princess dress and find my way out of the Labyrinth.
Imagine my excitement when my thinkgeek newsletter arrived in my inbox and I saw this?!

If you're not familiar with the film, you're probably looking at this plush toy and thinking "WTF is that!?" If you're a fan of Labyrinth, then you're probably salivating and thinking "How do I get me one of those?"
The toy is a giant sized version of the worm character that Sarah meets in the Labyrinth who, for some reason, has an English accent and wants her to meet the missus over a cup 'o' tea (oh, and happens to know the way through the Labyrinth, not that Sarah hears that part of the conversation). Yeah, it's a really tiny part of the movie, but Labyrinth memorabilia is so hard to come by.Here'e the scene from the film:
Well, I clicked my link in the newsletter only to find that they have sold out! Already! (sad face) Here's the link to thinkgeek site: Limited Edition Labyrinth Worm Plush
Here's hoping they restock "toot suite".
In the meantime, I found this cute Ludo coin pouch project on Cut Out and Keep:
See Labyrinth Ludo Coin Pouch and 1000's of others - or share your own on Cut Out + Keep
 |
| Love the hair, and the trippy way he played with his balls |
I wanted to be Sarah and save the little baby half brother, Toby. I wante to wear the princess dress and find my way out of the Labyrinth.
 |
| Oooh, pretty dress... Love those puffy 80s sleeves. |
Imagine my excitement when my thinkgeek newsletter arrived in my inbox and I saw this?!
If you're not familiar with the film, you're probably looking at this plush toy and thinking "WTF is that!?" If you're a fan of Labyrinth, then you're probably salivating and thinking "How do I get me one of those?"
The toy is a giant sized version of the worm character that Sarah meets in the Labyrinth who, for some reason, has an English accent and wants her to meet the missus over a cup 'o' tea (oh, and happens to know the way through the Labyrinth, not that Sarah hears that part of the conversation). Yeah, it's a really tiny part of the movie, but Labyrinth memorabilia is so hard to come by.Here'e the scene from the film:
Well, I clicked my link in the newsletter only to find that they have sold out! Already! (sad face) Here's the link to thinkgeek site: Limited Edition Labyrinth Worm Plush
Here's hoping they restock "toot suite".
In the meantime, I found this cute Ludo coin pouch project on Cut Out and Keep:
Thursday 10 March 2011
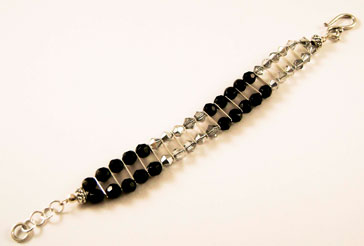
DIY: Super Quick Double Row Art Deco Inspired Bracelet
I'm a big fan of the Art Deco period so here's a bracelet project I designed that you can make in a less than an hour. Create your own with different styles of beads for a different look, or stick with black and silver for a classic style.

Materials:
Tigertail beading wire
2 x crimps
1 x clasp of your choice
2 x spacer beads
2 x bead tips
Jump rings for attaching and creating an extension chain
20 x silver plated spacer bars
20 x 5mm black faceted round glass beads
22 x 5mm silver-finish glass bicones
Tools:
Crimping pliers
Wire cutters
Chain nose pliers
Instructions:
1) Before we begin, organise your beads into 4 groups (10 x black, 10 x silver, 10 x black and 12 x silver).
2) Cut approximately 45cm of tigertail and fold in half.
3) Thread a crimp onto the wire and crimp it at the halfway point.
4) Thread the 2 cut ends onto a bead tip and check that the crimp is doing its job of holding the thread in place. If it's too small, take it off the bead tip and add a seed bead or another crimp. Close the bead tip.
5) Now let's start beading! Place one spacer bead onto both wire ends and then place a black bead on each separate wire end. This will begin the double row.
6) Next, add a spacer bar. The spacer bars not only add a design element, but serve to provide the bracelet with some structure and movement.
7) Add another single bead onto each wire end.
8) Repeat steps 6 and 7, working through your groups of beads until you have threaded your last 2 silver beads.
9) Join the 2 wire ends by placing your other spacer bead over both ends.
10) Thread through your other bead tip (make sure it's facing the correct way).
11) Use a crimp to secure the end of the wire and then close your bead tip.
TIP: Before you secure the end with your crimp, check that you are happy with the movement in the bracelet. If it moves too stiffly, loosen it a little. If it's too limp, push the beads closer together.
12) Now let's add your clasp and chain to your bead tips. On one end, attach your clasp with a jump ring. In my design, I have used a hook.
13) Finally, join some jump rings to the other end to form an extension chain!


Materials:
Tigertail beading wire
2 x crimps
1 x clasp of your choice
2 x spacer beads
2 x bead tips
Jump rings for attaching and creating an extension chain
20 x silver plated spacer bars
20 x 5mm black faceted round glass beads
22 x 5mm silver-finish glass bicones
Tools:
Crimping pliers
Wire cutters
Chain nose pliers
Instructions:
1) Before we begin, organise your beads into 4 groups (10 x black, 10 x silver, 10 x black and 12 x silver).
2) Cut approximately 45cm of tigertail and fold in half.
3) Thread a crimp onto the wire and crimp it at the halfway point.
4) Thread the 2 cut ends onto a bead tip and check that the crimp is doing its job of holding the thread in place. If it's too small, take it off the bead tip and add a seed bead or another crimp. Close the bead tip.
5) Now let's start beading! Place one spacer bead onto both wire ends and then place a black bead on each separate wire end. This will begin the double row.
6) Next, add a spacer bar. The spacer bars not only add a design element, but serve to provide the bracelet with some structure and movement.
 | |
| Spacer bars will help give your bracelet some strength, structure and a slinky movement. It also stops your beads rubbing against each other, which is important for glass beads. |
7) Add another single bead onto each wire end.
8) Repeat steps 6 and 7, working through your groups of beads until you have threaded your last 2 silver beads.
9) Join the 2 wire ends by placing your other spacer bead over both ends.
10) Thread through your other bead tip (make sure it's facing the correct way).
11) Use a crimp to secure the end of the wire and then close your bead tip.
TIP: Before you secure the end with your crimp, check that you are happy with the movement in the bracelet. If it moves too stiffly, loosen it a little. If it's too limp, push the beads closer together.
12) Now let's add your clasp and chain to your bead tips. On one end, attach your clasp with a jump ring. In my design, I have used a hook.
13) Finally, join some jump rings to the other end to form an extension chain!
 |
| The finished bracelet! |
Wednesday 25 August 2010
That's Noice!
I know I have lots of yarn at the moment and I know I don't need more. But Lincraft have extended their 30% off yarn sale to the 29th of August. That's this Sunday! As Kath & Kim would say "That's noice, different, unusual". Oh, the temptation is so great.


Thursday 29 July 2010
DIY Amigurumi: Baby Octopus and Coffee Cup

My amigurumi adventure continues and over the last month I have been working on a few projects at the same time. These are two of them. Enjoy!
Amigurumi Baby Octopus Pattern:

1 Ball of yarn in the colour of your choice
1 4mm Crochet Hook
Needle for embroidery and to sew the legs to the body
1 pair of safety eyes
Some yarn for embroidering the mouth
Polyfill Stuffing or stuffing from an old cushion
Head/Body:
Rnd 1: Make a magic ring with 6 sc. Use a stitch marker so you know where the start of each round is, then move it up as you go along. Note: do not join rounds.
Rnd 2: 2 sc in each sc around (Total of 12 sc in the round)
Rnd 3: *2 sc in next sc, sc in next sc; rep from * around (Total of 18 scin the round)
Rnd 4: *2 sc in next sc, sc in next 2 sc; rep from * around (Total of 24 sc in the round)
Rnd 5: *2 sc in next sc, sc in next 3 sc; rep from * around (Total of 30 sc in the round)
Rnd 6: *2 sc in next sc, sc in next 4 sc; rep from * around (Total of 36 sc in the round)
Rnd 7: *2 sc in next sc, sc in next 5 sc; rep from * around (Total of 42 sc in the round)
Rnds 8-17: Sc in each sc around.
Rnd 18: *Sc2tog, sc in next 5 sc; rep from * around (Total of 36 sc in the round)
Rnd 19: *Sc2tog, sc in next 4 sc; rep from * around (Total of 30 sc in the round)
Rnd 20: *Sc2tog, sc in next 3 sc; rep from * around (Total of 24 sc in the round)
Now attach your safety eyes and embroider a mouth before adding stuffing.
Rnd 21: *Sc2tog, sc in next 2 sc; rep from * around (Total of 18 sc in the round)
Rnd 22: *Sc2tog, sc in next sc; rep from * around (Total of 12 sc in the round)
Rnd 23: (Sc2tog) around (Total of 6 sc in the round)
Fasten off, leaving a long tail for sewing the legs on later. We'll sew on all 8 with it so make sure it's long. Weave the tail through to where you want to start attaching the legs.
Tentacles/Legs (make 8)
Rnd 1: Make a magic ring with 6 sc (use a stitch marker as before)
Rnd 2: 2 sc in each sc around (Total of 12 sc in the round)
Rnds 3-10: Sc in each sc around.
Fasten off. Hide any tails inside each tentacle.
Assembly:
Stuff each tentacle and pin to body to work out the placement. Once you have the tentacles pinned, thread your needle with your long tail from the body and start sewing.
Make sure that when you sew, you are going through the tops of each tentacle (this automatically closes one so the stuffing won't come out). Once you have completed sewing around the tentacles and come back to the start, fasten off and weave in the end into the body.
Amigurumi Coffee Cup:

What you will need:
1 Ball of yarn in the colour of your choice for the cup
Brown yarn for the coffee
1 4mm Crochet Hook
Needle for assembly
Polyfill Stuffing or stuffing from an old cushion
Coffee Cup
Using your cup colour yarn:
Rnd 1: Magic ring with 6 sc. Do not join rounds, but use a stitch marker to mark the start of each round and move up as you go.
Rnd 2: Work 2 sc in each st around (Total of 12 sts in the round)
Rnd 3: *2 sc in next st, sc in next st, rep from * around (Total of 18 sts in the round)
Rnd 4: Working through back loops only, sc in each st around (Total of 18 sts in the round)
Rnd 5: *2 sc in next st, sc in each of next 2 sts, rep from * around (Total of 24 sts in the round)
Rnd 6: *2 sc in next st, sc in each of next 3 sts, rep from * around (Total of 30 sts in the round)
Rnd 7: *2 sc in next st, sc in each of next 4 sts, rep from * around (Total of 36 sts in the round)
Rnds 8 -14: Sc in each st around.
Fasten off.
Coffee
Using your brown yarn:
Rnd 1: Magic ring with 6 sc. Do not join rounds, but use a stitch marker to mark the start of each round and move up as you go.
Rnd 2: Work 2 sc in each st around (Total of 12 sts in the round)
Rnd 3: *2 sc in next st, sc in next st, rep from * around (Total of 18 sts in the round)
Rnd 4: *2 sc in next st, sc in each of next 2 sts, rep from * around (Total of 24 sts in the round)
Rnd 5: *2 sc in next st, sc in each of next 3 sts, rep from * around (Total of 30 sts in the round)
Rnd 6: *2 sc in next st, sc in each of next 4 sts, rep from * around (Total of 36 sts in the round)
Fasten off.
Handle
Using your cup colour yarn:
Rnd 1: Make a mgic ring with 5 sc. Use a stitch marker as you go.
Rnd 2: Work 1 sc in each st around (Total of 5 sts in the round)
Repeat Rnd 2, stuffing lightly as you go, until piece measures about 7cm from beg. Fasten off.
Assembly
Fill the coffee cup with stuffing. Sew the coffee coloured top over the cup using the colour of the cup. Sew on the handle. Weave in ends.
Saturday 10 July 2010
DIY Amigurumi: Cupcakes
Ok, I'm on a little bit of a cupcake theme today. I've been feeling pretty crook lately so I've been doing lots of resting on the couch with my crochet to stop me going crazy. And since cupcakes and sweet things make me smile. I'm going to make some crochet cupcakes! Here's the pattern I'm going to use:
Crochet an Amigurumi Cupcake - More DIY How To Projects
Crochet an Amigurumi Cupcake - More DIY How To Projects
Subscribe to:
Posts (Atom)
